Halloween Paper Plate Mask

Supplies:

  • 1 paper plate
  • Orange paint or markers
  • Black construction paper (or black marker)
  • Green pipe cleaner or construction paper
  • Scissors
  • Glue stick or tape
  • Popsicle stick (optional, for holding the mask)

Steps:

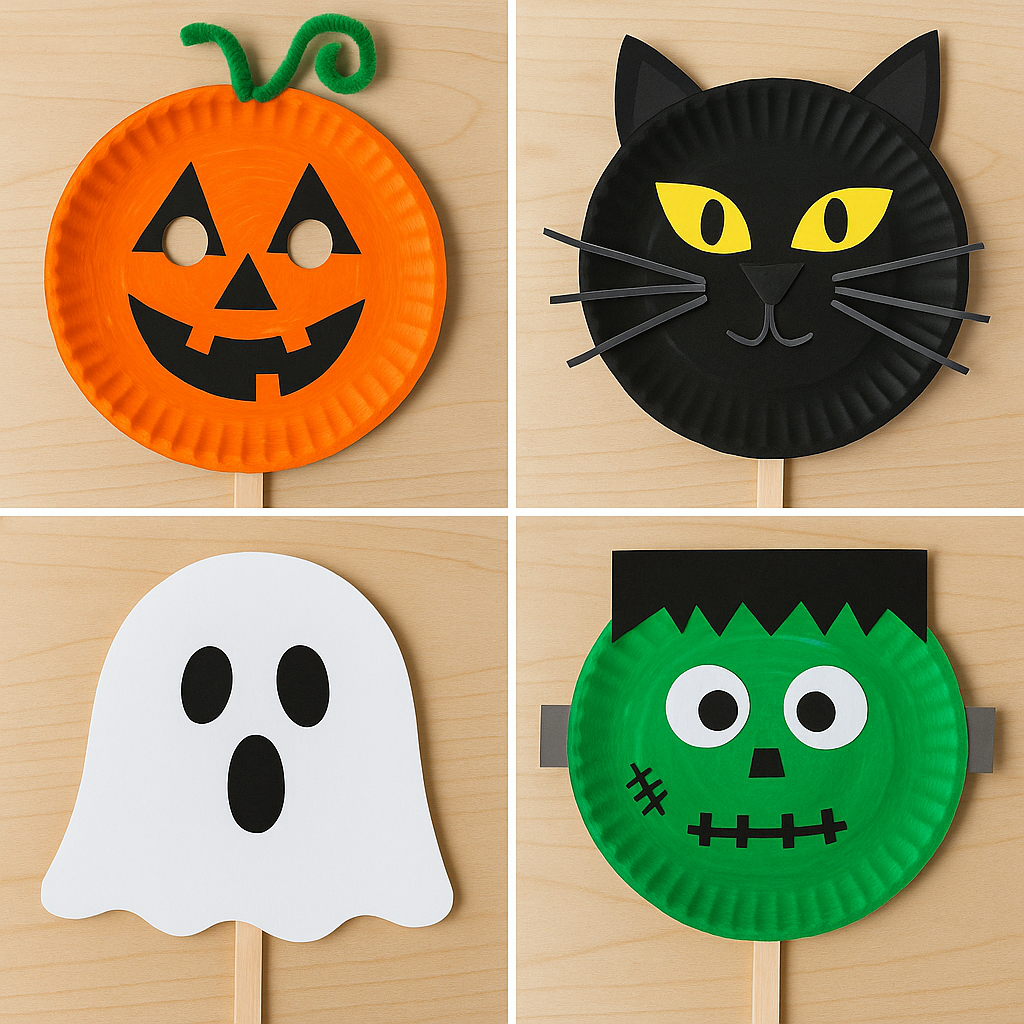
  1. Paint or color the paper plate orange. Let it dry.
  2. Cut out two eye holes.
  3. Cut out a triangle nose and mouth from black construction paper (or draw them on with marker) and glue them down.
  4. Twist a green pipe cleaner into a curly “pumpkin vine” and tape/glue it to the top of the plate.
  5. (Optional) Tape a popsicle stick to the bottom to hold the mask like a Halloween disguise!

✨ Variation: Instead of a pumpkin, kids can decorate their plate as a black cat, ghost, or Frankenstein using paint and paper shapes.

Watercolor Nature Collage

Here’s a fun and easy fall kids craft using sticks, leaves, and watercolor paints:

🍂 Watercolor Leaf & Stick Collage

Materials Needed:

  • Fallen leaves (different shapes & sizes)
  • Small sticks or twigs
  • Watercolor paints
  • Paintbrushes
  • Cup of water
  • White cardstock or watercolor paper
  • Glue or glue stick

Directions:

  1. Collect Nature Items
    Take a short nature walk and gather colorful fall leaves and sticks. Try to find a variety of leaf shapes.
  2. Paint the Leaves
    Use watercolors to paint directly onto the leaves. Kids can make them bright, rainbow-colored, or stay with warm fall tones (reds, oranges, yellows, browns). Let them dry on paper towels.
  3. Paint a Background
    On the cardstock or watercolor paper, have kids paint a simple background—a light blue sky, a sunset, or just a splash of blended fall colors. Let dry.
  4. Create a Collage
    Once dry, glue the sticks onto the paper to form tree trunks, branches, or fun shapes (like a leaf frame). Then glue the painted leaves onto the branches, or scatter them around like falling leaves.
  5. Optional Details
    Kids can add grass at the bottom, draw pumpkins, or flick watered-down paint with the brush for a “fall splatter” effect.

Finished Craft:

You’ll have a colorful 3D fall tree collage where real leaves and sticks mix with watercolor art. Every child’s version will look unique!

Leaf Bug Crafts

Materials Needed

  • A variety of leaves (different shapes, sizes, and colors)
  • Glue stick or white craft glue
  • Construction paper or cardstock (light-colored background works best)
  • Googly eyes (optional, or draw your own with a marker)
  • Markers or crayons
  • Scissors (kid-safe)

Instructions

  1. Collect Leaves
    Take a little nature walk and gather leaves. Try to find round ones (for beetles or ladybugs), long ones (for dragonfly wings), and pointy ones (for antennae or legs).
  2. Create the Bug’s Body
    • Use a large oval or round leaf for the bug’s main body.
    • Add a smaller leaf on top for the head.
  3. Add Wings & Legs
    • Dragonfly: two long skinny leaves on each side.
    • Ladybug: one large round leaf, cut down the middle for wings.
    • Beetle: oval leaves layered for a hard shell.
  4. Decorate
    • Glue on googly eyes or draw them.
    • Use markers to add spots, stripes, or antennae.
    • Draw extra legs around the leaves to complete the bug.
  5. Make a Bug Collection
    Create different bugs on the same paper—a butterfly, beetle, dragonfly, ladybug—turn it into a “Leaf Bug Zoo”!

Extension Ideas

  • 3D Bugs: Glue your leaf bugs onto popsicle sticks to make puppets.
  • Bug Habitat: Draw grass, flowers, or a tree around them so the bugs have a home.
  • Learning Twist: Label the bugs with names and fun facts (great for older kids).

Fall Leaf Animal Craft

Here’s a simple and fun kids’ craft using fall leaves that you can do at home or in the classroom:

🍂 Fall Leaf Animal Craft

Materials:

  • A collection of real fall leaves (different shapes, sizes, and colors)
  • White construction paper or cardstock
  • Glue stick or liquid glue
  • Googly eyes (or draw eyes with a marker)
  • Markers or crayons

Directions:

  1. Collect leaves – Take a nature walk with kids and gather colorful leaves. Try to find a variety of shapes (round, pointy, oval).
  2. Choose an animal – Kids can pick a favorite animal (owl, fish, hedgehog, butterfly, or even make up a creature!).
  3. Arrange the leaves – Use the leaves as body parts. For example:
    • A big leaf = owl body
    • Small leaves = owl wings
    • Tiny leaves = ears or feathers
    • Long leaf = fish tail
  4. Glue down the design – Once they’re happy with the layout, glue the leaves onto paper.
  5. Add details – Glue on googly eyes or draw eyes, noses, whiskers, etc. with markers.
  6. Display proudly! – Kids can title their leaf animals and hang them up as fall artwork.

🍁 Variation Ideas:

  • Leaf Collage Tree – Glue a brown paper trunk and add leaves to make a tree.
  • Leaf Rubbing Art – Place leaves under paper and color with crayons to reveal textures.
  • Leaf Crown – Tape or staple leaves around a strip of cardstock to make a wearable crown.

Farmers Market Scavenger Hunt for Kids

Here’s a fun kids scavenger hunt for a farmers market! You can print it as a checklist or turn it into a game with stickers/prizes.

🧺 Farmers Market Scavenger Hunt for Kids

✅ Find These Fruits & Veggies

  • 🍎 A red fruit
  • 🍌 Something yellow
  • 🥒 A bumpy vegetable
  • 🥕 Something orange
  • 🍇 A bunch of something

✅ Color Hunt

  • 🌽 Something green and yellow
  • 🍓 Something red and tiny
  • 🥦 Something shaped like a tree
  • 🍠 Something purple

✅ Market Sights & Smells

  • 🥖 A bakery stand with bread or cookies
  • 🌻 Flowers for sale
  • 🍯 A jar of honey
  • 🧀 A block of cheese
  • 🎶 Someone playing music

✅ Bonus Challenges

  • Find the biggest fruit or vegetable you can spot!
  • Count how many dogs you see at the market 🐶
  • Ask a farmer what their favorite thing to grow is 🌱

✨ Optional Twist: Give each child a small bag and let them collect 2–3 scavenger hunt items (like a fruit, veggie, or flower) to bring home.